
If you want to keep your feline friend healthy and happy, then it’s essential to pay attention to their hygiene. One area that often gets overlooked is their ears. Just like humans, cats can accumulate dirt, wax, and debris in their ears, which can lead to discomfort and even infections if left untreated. That’s why learning how to clean cat’s ears is crucial for their overall well-being.
In this article, we will guide you through the process of cleaning your cat’s ears effectively. We’ll provide you with tips and tricks that will make the experience easier for both you and your furry companion. From gathering the necessary supplies to properly cleaning their ears, we’ve got you covered.
We’ll also discuss common signs of ear problems in cats and when it’s time to seek veterinary care.
By following our expert advice and incorporating regular ear cleaning into your cat’s grooming routine, you can help prevent potential health issues and maintain their optimal ear health. So let’s dive in and ensure those adorable little ears stay clean as a whistle!
- Understanding the Importance of Ear Cleaning for Cats
- Gather the Necessary Supplies for Ear Cleaning
- Preparing Your Cat for Ear Cleaning
- How to Properly Clean Your Cat’s Ears
- Signs of Ear Problems in Cats
- When to Seek Veterinary Care
- Tips for Maintaining Healthy Ears in Cats
- Frequently Asked Questions
- Conclusion
Understanding the Importance of Ear Cleaning for Cats

You need to understand that regular ear cleaning is crucial for maintaining your cat’s ear health. Understanding the causes of ear problems in cats is the first step towards preventing them.
Cats are prone to ear infections due to factors such as allergies, parasites, and excessive wax buildup. Regular cleaning helps remove dirt, debris, and excess wax, reducing the risk of infection.
Tips for preventing ear infections in cats include keeping their ears dry after bathing or swimming and regularly checking for any signs of redness, swelling, or discharge. By being proactive with your cat’s ear health, you can prevent discomfort and potential complications.
Now that you know why it’s important to clean your cat’s ears, let’s move on to gathering the necessary supplies for this task.
Gather the Necessary Supplies for Ear Cleaning

To properly clean your cat’s ears, you need to gather the necessary supplies. First and foremost, choose a cleaning solution specifically designed for cats’ ears. This ensures that it’s safe and effective for removing dirt and debris.
Secondly, have cotton balls or gauze pads ready to use during the cleaning process. These’ll be used to gently wipe away any excess solution and debris from your cat’s ears.
By having these supplies prepared ahead of time, you can ensure a thorough and efficient ear cleaning session for your feline friend.
Choose the Right Cleaning Solution
When selecting a cleaning solution for your cat’s ears, it’s important to opt for a gentle formula that is specifically designed for feline use, such as the one recommended by your veterinarian. This ensures that the solution is safe and effective for your cat’s delicate ears.
Natural options like homemade solutions can be tempting, but they may not have undergone rigorous testing to ensure their safety. Commercial ear cleaners are formulated with ingredients that help remove dirt, wax, and debris from your cat’s ears without causing any harm. They’re often pH-balanced to match the acidity of your cat’s ear canal, reducing the risk of irritation.
Having a reliable commercial cleaner on hand provides peace of mind during the cleaning process. Now that you’ve chosen the right cleaning solution, let’s move on to preparing the necessary supplies.
- Opt for a gentle formula
- Consider hypoallergenic options
- Look for pH-balanced formulations
Now that you have selected the perfect cleaning solution, it’s time to have cotton balls or gauze pads ready for the next step: preparing your cat’s ears for cleaning.
Have Cotton Balls or Gauze Pads Ready
Get those cotton balls or gauze pads ready to ensure a smooth and hassle-free process of cleaning your furry friend’s ears.
Cotton balls and gauze pads are essential tools for effectively removing dirt, debris, and excess earwax from your cat’s ears. They provide the necessary absorbency and softness to gently clean the delicate ear canal without causing any harm or discomfort to your cat.
When choosing cotton balls or gauze pads, make sure they’re clean and lint-free. Avoid using Q-tips or any other sharp objects as they can damage the sensitive inner ear. You can dampen the cotton ball or gauze pad with an approved cleaning solution to aid in removing stubborn debris.
Once you have your cotton balls or gauze pads ready, you’re one step closer to ensuring your cat’s ears stay clean and healthy. Now it’s time to prepare your cat for the ear cleaning process, which’ll help make it a positive experience for both of you.
Preparing Your Cat for Ear Cleaning

Before you even begin cleaning your cat’s ears, make sure you’ve created a calm and comfortable environment for them. This is crucial to ensure a successful ear cleaning session. Start by finding a quiet room where there are no distractions or loud noises that could startle your cat.
Make sure to have all the necessary supplies within reach, such as cotton balls or gauze pads and an ear cleaning solution specifically made for cats. To help your cat relax, use gentle preparing techniques like petting them softly or offering treats as positive reinforcement. Some cats may also benefit from calming methods such as using pheromone sprays or playing soothing music in the background.
Once your cat is calm and comfortable, you can proceed to the next section about how to properly clean their ears without causing any discomfort or harm.
(Note: It’s important to consult with your veterinarian before attempting any home ear cleaning procedures on your cat.)
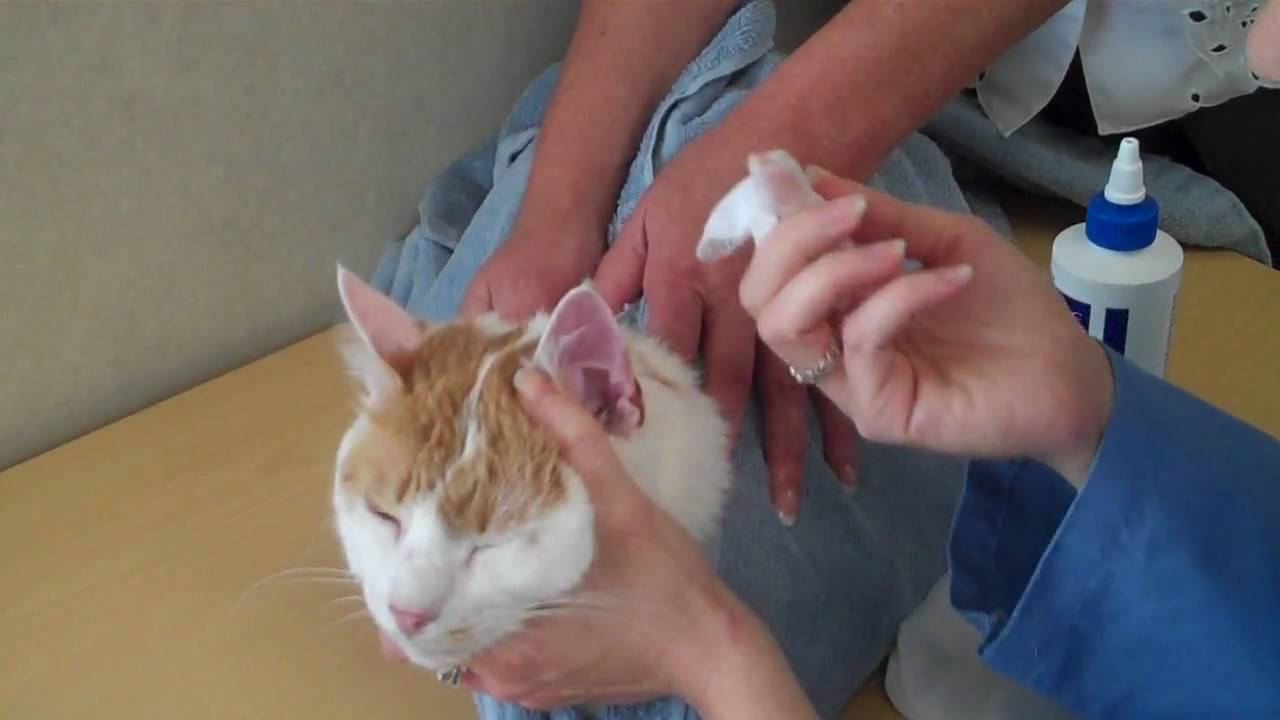
How to Properly Clean Your Cat’s Ears

To properly clean your cat’s ears, start by gently lifting and holding the ear flap. This will allow you to have better access to the inner part of the ear.
Next, apply a small amount of cleaning solution specifically made for cats onto a cotton ball or gauze pad. Use this to wipe the inside of the ear, making sure to reach all areas.
Gently Lift and Hold the Ear Flap
As you carefully grasp the ear flap, it’s like cradling a delicate flower petal in your hand. This holding technique is crucial to ensure that your cat feels secure and safe during the cleaning process. By gently lifting and holding the ear flap, you allow better access to the inner ear while preventing any discomfort for your furry friend.
Properly holding the ear flap also helps prevent ear infections. When dirt, wax, or debris accumulate in your cat’s ears, it can create a breeding ground for bacteria and yeast. Regular cleaning using a gentle touch ensures that these substances are removed, reducing the risk of infection.
Now that you have mastered the art of securing the ear flap, it’s time to move on to applying a small amount of cleaning solution.
Apply a Small Amount of Cleaning Solution
Once you’ve delicately cradled the ear flap, gently apply a small amount of the cleaning solution to effectively remove any buildup and keep your furry friend’s ears healthy.
Cleaning your cat’s ears requires a specific technique to ensure safety and effectiveness. It’s important to use a cleaning solution that’s specifically formulated for cats, as human products can be too harsh and cause irritation. Look for recommended products that are gentle, non-irritating, and designed to dissolve wax and debris.
Applying the cleaning solution helps break down any dirt or wax that may be blocking the ear canal. This will promote better ear hygiene and prevent infections.
After applying the solution, transition into using cotton balls or gauze pads to wipe away any loosened debris from inside the ear canal without causing discomfort or damage.
Use Cotton Balls or Gauze Pads to Wipe the Ear
After applying the cleaning solution, gently wipe the ear using cotton balls or gauze pads to ensure a thorough clean and maintain your cat’s ear health. Using alternative ear cleaning methods can be effective in preventing ear infections in cats.
Here are three important things to keep in mind when using cotton balls or gauze pads:
- Be gentle: Cats have sensitive ears, so it’s crucial to handle them with care. Avoid applying too much pressure while wiping to prevent any discomfort or injury.
- Use fresh materials: Always use clean cotton balls or gauze pads for each ear cleaning session. Reusing dirty materials can introduce bacteria and potentially worsen any existing ear problems.
- Reach all areas: Make sure to wipe both the outer and inner parts of the ear, but don’t insert anything into the ear canal itself as this can cause damage.
By following these tips, you can effectively clean your cat’s ears and reduce the risk of infections. Now let’s move on to recognizing signs of potential ear problems in cats without delay.
Signs of Ear Problems in Cats
If your furry friend is constantly scratching their ears or shaking their head, it may be a sign of ear problems in cats. These symptoms could indicate the presence of ear mites, which are tiny parasites that can cause irritation and discomfort.
Excessive scratching is another common sign of ear issues in cats. It’s important to pay attention to any changes in your cat’s behavior or habits when it comes to their ears, as these could be indicators of a problem that needs attention.
Regularly checking your cat’s ears and noticing any abnormal signs can help you catch potential issues early on. However, if you notice persistent scratching or shaking that doesn’t improve with at-home cleaning methods, it’s best to seek veterinary care. Taking swift action will ensure proper treatment for your feline friend’s ear health.
When to Seek Veterinary Care
If you notice persistent or severe symptoms in your cat’s ears, it’s important to seek veterinary care. These symptoms could include continuous scratching or rubbing of the ears, redness or swelling, discharge from the ears, or a strong odor.
Additionally, if your cat has multiple recurrences of ear infections despite treatment, it’s advisable to consult with a veterinarian for further evaluation and management.
Lastly, if attempts to clean your cat’s ears are unsuccessful or result in pain for your cat, it’s best to have a professional handle the cleaning process to ensure proper care and minimize discomfort for your furry friend.
Persistent or Severe Symptoms
When your cat’s ears are persistently or severely symptomatic, it’s like a never-ending storm brewing inside their tiny ear canals, causing them discomfort and distress.
If your furry friend is experiencing persistent or severe symptoms such as continuous itching, redness, swelling, discharge, or foul odor from the ears, it’s time to seek professional help.
While there are some home remedies you can try initially, such as cleaning the ears with a gentle solution recommended by your veterinarian, it’s important to have a thorough examination done by a vet. They can determine the underlying cause of these symptoms and provide appropriate treatment.
Multiple recurrences of ear infections could indicate an underlying condition that needs further investigation. So don’t delay in seeking professional care for your cat’s ear troubles.
Multiple Recurrences of Ear Infections
Experiencing multiple recurrences of ear infections can be incredibly distressing for both you and your beloved feline companion. To help you navigate this frustrating situation, here are some important points to consider:
- Causes of recurrent ear infections:
- Allergies: Environmental allergies or food sensitivities can lead to ongoing inflammation and increased risk of infections.
- Underlying health conditions: Conditions like diabetes or autoimmune disorders may weaken the immune system and make cats more susceptible to ear infections.
- Ear anatomy: Certain breeds with floppy ears or excessive hair in the ear canal are prone to trapping moisture and debris, creating a perfect environment for bacteria or yeast.
- Preventive measures for recurring ear infections:
- Regular cleaning: Use a veterinarian-approved cleaner to remove excess wax and debris from your cat’s ears on a routine basis.
- Diet management: Feed your cat a high-quality, balanced diet that supports overall health and strengthens their immune system.
- Environmental control: Minimize exposure to potential allergens in your home, such as dust mites or certain plants.
By understanding these causes and implementing preventive measures, you can reduce the frequency of recurrent ear infections in your cat. However, if you’ve had unsuccessful or painful cleaning attempts in the past, it’s crucial to address this issue promptly.
Unsuccessful or Painful Cleaning Attempts
Having struggled with previous attempts, it’s important to address the issue of painful or unsuccessful ear cleaning in order to provide relief for your furry friend. If you have an uncooperative cat who resists having their ears cleaned, there are alternative methods you can try.
One option is using a specially formulated ear cleaning solution that can be applied onto a cotton ball and gently wiped around the outer part of the ear. This method avoids inserting anything into the ear canal, which may cause discomfort.
Another alternative is using pre-moistened wipes designed specifically for cat ear cleaning. These wipes are gentle and convenient to use, making the process less stressful for both you and your cat.
By finding an approach that works best for your cat, you can ensure their ears stay clean and healthy.
Moving forward to maintaining healthy ears in cats…
Tips for Maintaining Healthy Ears in Cats

To keep your feline friend’s ears in tip-top shape, it’s essential to maintain their cleanliness and prevent any potential issues. Maintaining ear hygiene is crucial for preventing ear infections in cats.
Start by regularly inspecting your cat’s ears for any signs of dirt, wax buildup, or redness. Gently clean the outer part of the ear using a soft cloth or cotton ball moistened with a veterinarian-approved cleanser. Avoid using Q-tips as they can push debris further into the ear canal and cause harm.
Additionally, keeping your cat’s environment clean can help reduce the risk of ear problems. Regularly vacuuming and dusting can minimize allergens that may irritate their ears.
Lastly, if you notice any unusual symptoms like discharge, strong odor, or excessive scratching, consult your veterinarian for a proper diagnosis and treatment plan to ensure your cat’s ears stay healthy.
Frequently Asked Questions
Can I use regular cotton swabs to clean my cat’s ears?
Regular cotton swabs are not recommended for cleaning your cat’s ears as they can be too harsh and may cause injury. Instead, opt for alternative ear-cleaning solutions specifically designed for cats and follow proper techniques to ensure their safety and well-being.
How often should I clean my cat’s ears?
To prevent ear infections in cats and catch any signs of ear problems early on, it is recommended to clean your cat’s ears once a month. Regular cleaning helps remove excess wax and debris, promoting healthy ears.
Is it normal for my cat’s ears to have a slight odor?
Yes, it is normal for your cat’s ears to have a slight odor. However, if the odor becomes strong or unpleasant, it may indicate a cat’s ear infection. There are home remedies available to help with cat’s ear odor.
Can I use hydrogen peroxide to clean my cat’s ears?
It is not recommended to use hydrogen peroxide to clean your cat’s ears as it can be irritating and potentially harmful. There are alternative ear-cleaning solutions specifically designed for cats that are safer and more effective.
Can I use olive oil to clean my cat’s ears?
You can use olive oil as a natural alternative for cleaning your cat’s ears. It is gentle and helps to soften earwax, making it easier to remove. However, always consult your veterinarian before trying any new ear-cleaning solutions.
Conclusion
In conclusion, now you know how to clean your cat’s ears with ease. By understanding the importance of ear cleaning and gathering the necessary supplies, you can ensure your feline friend’s ears stay healthy.
Remember to prepare your cat for cleaning and follow the proper technique to get rid of any dirt or debris. Keep an eye out for signs of ear problems and seek veterinary care if needed.
With these tips, you can maintain your cat’s healthy ears and keep them purring in delight. So go ahead, give those ears some love!
Read more: